I originally both RaspberryPi to set up my own VPN, but it turned out that my internet provider doesn’t let me mess with my router settings – so it’s probably the first thing You should check if you’re planning on doing that.
So intead I started my journey with Pi by setting up DNS black hole which stop adds from being displayed.
What is Pi-Hole ?
It is DNS server which stop ads from being displayed on all your devices. While You’re visiting a site Pi-hole download its contents, but it will detect the domains used to serve advertisements on that website and instead of looking up the real address of those sites, it will send a fake address which prevents ads from being downloaded. It is way better than browser AddOns like AdBlocker, because those addons still download content and then hide it on website. So it actually might speed up Your browsing experience in general.
1. Set up your RaspberryPi
If You don’t have Your Pi up and running follow this beautiful tutorial from https://www.raspberrypi.org/ which will guide You through all necessary steps to make Your Pi alive.
2. Give Your Pi Static IP Address and enable SSH (optional)
If You don’t want to access Your Pi remotely then You can skip this step (Pi-hole installer will add eth0 interface for You), but it’s generally a good idea to understand how it is done
This was actually troublesome. There are many tutorials out there but this one works like a charm.
Basically You need to run netstat –nr to find out your default gateway:

Then You need to check Your DNS server addresses with
cat /etc/resolv.conf
Write down address (there could be also two ip adressess) then run:
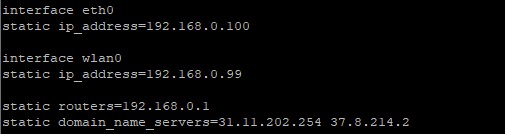
sudo nano /etc/dhcpcd.conf
Scroll down to the bottom of the file. Eth0 and wlan0 are usually default interface names, to makes sure you can run ifconfig. I am assigning 192.168.0.100 for ethernet and 192.168.0.99 for wlan. That means every time that my router sees Pi it will reserve those IPs for me.
Default gateway goes to static routers value and DNS addressess from /etc/resolv.conf go under, separated with space.
To save file hit: ctrl+x -> y -> enter and we’re ready to reboot !
Run: sudo reboot
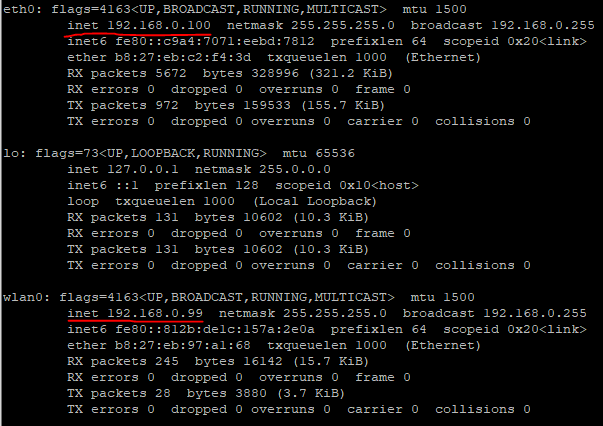
Now, when i run ifconfig we can see that static addresses for wlan and ethernet are just what we set them to
Bonus
Enable SSH connection to access Pi terminal remotely (for example by PuTTY on windows or app on android) by typing those commands into terminal
cd /boot
touch ssh
sudo reboot
3. Run Pi-hole installer
It is super important that Your Pi is connected with ethernet cable to Your router !
Open terminal, paste link and enjoy beautiful installer from Pi-hole®
curl -SSL https://install.pi-hole.net | bash
Basically hit enter through all steps, IP address for Your server will pop up somewher (if you followed step 2 it will be whatever You’ve put in dhcpcd.conf !) and make sure to install admin panel and write down password for Your admin panel.
For more info:
https://github.com/pi-hole/pi-hole/#one-step-automated-install
4. Configure Your router/devices
If You followed whole tutorial Your admin panel should be available at http://192.168.0.100/admin/
Now You have to configure Your router to use Pi-hole IP as the only DNS entry. In my case it’s impossible, cause I cannot control my router settings in any way (god bless my ISP). Here’s a quick tutorial from Pi-hole about how to do it https://discourse.pi-hole.net/t/how-do-i-configure-my-devices-to-use-pi-hole-as-their-dns-server/245
In case you are in same situation You have to change DNS manually on all of Your devices
At home I’m using my windows machine and android phone to browse web, let’s take a look at my WiFi connection on android
Android


Go to WiFi details and edit DNS 1 field so it matches Pi-hole IP
When I go to admin panel we can see routed android device

We can see also my router and PC, which is connected to network, but does not use Pi-hole. Let’s change it
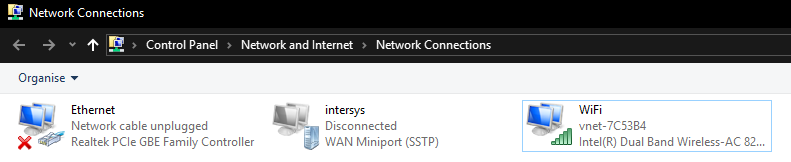
Windows 10
On Windows 10: Open Control Panel -> Network and Internet -> Network and Sharing Center -> Change Adapter Settings (from side menu)
or simply go to
Control Panel\Network and Internet\Network Connections
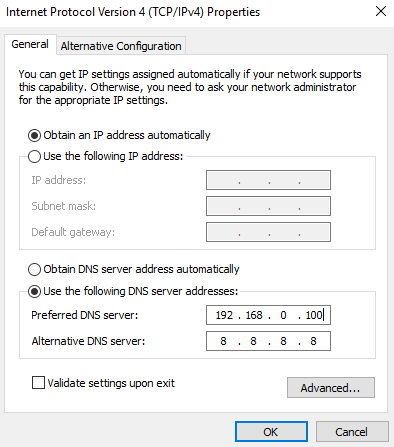
I’m connecting with WiFi. Right click on WiFi icon, choose properties and then in WiFi properties window select Internet Protocol Version 4 (TCP/IPv4) and hit Properties
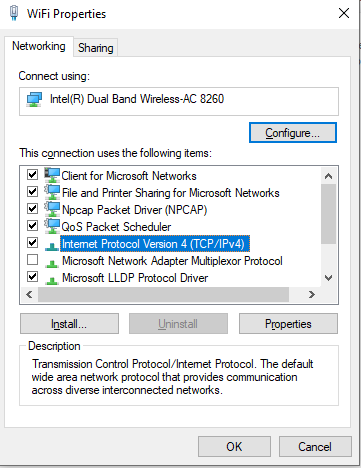
Now You can set Your DNS address to Pi-hole.
Now let’s take a look at admin panel once again

In case Your devices didn’t turn green reset internet connection, reconnect to WiFi, reboot You devices.
That’s it. Now You can enjoy Ad-free internet. I checked how much would this pleasure cost and it turns out that my RaspberryPi consumes 2-3W, so it gives us around 25kWh per Year
1kWh in Poland costs around 0,15 € , which gives us about 25000 * 0,15 € = 3,75 €
So I’ll be paying around 4 € / year to enjoy ad-free internet, that’s just amazing, isn’t it ?